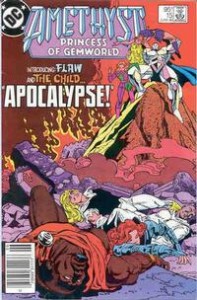
It is a bit of a slog wrapping up my coverage of the last couple issues of the second series of Amethyst, because such unpleasant things happen to her. The cover of this issue shows new characters Flaw and The Child being mean to Amethyst.
Flaw is holding Amethyst over his head, about to throw her down on a pile of rubble where Lord Garnet, Lady Turquoise, the Diamond Priest and Prince Topaz are already unconscious.
The text on the cover proclaims “Introducing Flaw and The Child…Apocalypse!” I am stunned that Flaw and the Child were only around for two issues, because I found them so incredibly annoying that when I used to think back about this series, they were taking up the mental space of a six issue story arc.
Dark Opal continues to menace people as only he can. Perhaps he is more menacing because he is naked with a strategically placed shadow covering up his butt. Dark Opal complains about the quality of his welcome, saying that he expected refreshments and a party to welcome him back from the dead. Topaz tells him to return to the grave, because The Gemworld no longer fears him. Opal says “My grave was a dark and lonely place, Topaz. I missed the light of my Gemworld’s sun. And I missed all of you, my fellow lords and ladies. Can you not say you missed me?? HAHAHAHAHAHAHAHAHAHA!”
Dark Opal abruptly explodes, distressed that his bargain for one more chance isn’t being honored. I find this somewhat anticlimactic.
Little pieces of Dark Opal pierce the Diamond Priest. That must be quite painful. Flaw and the Child emerge from Dark Opal’s remains. So Carnelian got fat and blew up, producing Dark Opal, Dark Opal blows up, producing the annoying duo. This really makes very little sense. Gemworld villains are evidently a set of Russian nesting dolls.
The Child can read Amethyst’s mind and knows all about her recent encounter with Dr. Fate and her real identity as Amy Winston. Amethyst doesn’t respond well to The Child’s threats, and Flaw grabs her face and crushes her into a wall. Lord Garnet leaps to her defense and Flaw vaporizes his sword. Amethyst asks The Child who he is, and he replies with the witticism “That’s for me to know and you to find out.” The other nobles try to defend Amethyst and are also struck down.
The Child moves to approach the Diamond Priest, who is lying on the floor in agony. Topaz stands over him in an attempt to defend him, saying “I warn you by the blood of my father, you’ll not touch this man.” The Child says “Topaz, anyone tell ya you’re a real wimp?” and walks though him. Topaz collapses. The Child leans over the Priest with the following disturbing result:
Garnet confronts Flaw, saying that he will have vengeance. Back on Earth, Emmy sees Rita being loaded into an ambulance. Rita has gone insane. Lord Garnet tries to fight Flaw with his fists, and gets horribly beaten. Amethyst wishes that she could fight in his place, but she can’t since she’s blind. The Child makes an annoying comment about Garnet and Amethyst tells him to shut up, touching his shoulder. A strange mystical reaction takes place. The Child is wounded and Amethyst notices that their touch had a repelling effect like magnets.
There’s some relatively uneventful bickering and fighting, and it is clear that The Child is an agent of Chaos come to reclaim the Gemworld. Amethyst begins to gain greater control over her new powers as a Lord of Order. The Child has a temper tantrum and reduces Castle Amethyst to rubble.
He and Flaw go home to rest.
Topaz claws his way out of the rubble, saying “Amethyst…Castle Amethyst…All Lost…”
Tune in soon for the incredibly depressing conclusion!


